Best Palworld 1.0 Base Locations with Coordinates: Early Game, Resources & Raid-Resistant Bases
Update log (1)
- — Expanded with four original data charts (a base-capability heatmap, a coordinate-plane map, a resource-vs-enemy-level risk/reward plot and a base × resource supply matrix) and a free Base Location Finder tool. Applied post-launch coordinate corrections against game8 (Ore Galore is 7 ore not 8; the Guardian peak is (180, −39), not the (190, −40) older guides use and never the sign-flipped (192, 38); the North Plateau flat has no ore — ore sits south at (264, −548)). Added an 11th base — gamerant's tested main-island one-stop — and softened 'raid-proof' to 'raid-resistant' after confirming 1.0 added an anti-stuck raid countermeasure.

- For your first base, the safe pick is the Plateau of Beginnings (North) flat at ~(232, −487) — flat, temperate, enemies Lv 1–3. It has stone, wood, Paldium and berries but no ore on the flat itself (ore is a short walk south). If you’d rather mine hard immediately, camp the ~7-ore ‘Ore Galore’ hilltop near the first tower at ~(156, −396).
- The best all-round main base is the ore-and-coal peak near the Sealed Realm of the Guardian at ~(180, −39) — roughly 8 ore plus 6 coal in one build radius (community estimate). A tested new-in-1.0 alternative is gamerant’s main-island one-stop at ~(290, −100). Then specialise: sulfur at Mount Obsidian ~(−744, −442), 9 Pure Quartz at Astral Mountains ~(−212, 250), oil on Sakurajima ~(−646, 270).
- 1.0 changed the base calculus: it spread ore more widely, added over-water building and node-free mining structures, and reworked raids into a wave-based system with an anti-stuck countermeasure — so no terrain base is truly ‘raid-proof’ any more. You have up to 4 base slots (a hub plus specialist outposts).
- Use the charts to compare bases at a glance, and the free Base Location Finder to score every base against your own priorities, filter by the resource you need, match a base to a purpose, and sort by distance from your current coordinates.
Where you put your base is the biggest early decision in Palworld — a good spot with flat ground and ore nodes fast-forwards your whole run, and a bad one has you hauling stone up a hill for hours. This guide gives the best base locations in Palworld 1.0 with exact map coordinates, backed by four original comparison charts and a free Base Location Finder tool that ranks every spot against your own priorities. It also covers what 1.0 actually changed about base placement — including why no base is truly “raid-proof” any more.
What makes a good base in 1.0
Rank your priorities roughly like this:
- Flat, open ground — still the #1 factor. Pals path badly on slopes, big Pals get stuck, and every blocked tile wastes part of your Palbox’s circular build radius. A slightly worse resource spot on flat ground beats a great one on a cliff face.
- Resource nodes in the build radius — ore, coal, sulfur (and later quartz/oil). The more nodes inside the Palbox circle, the less time your miners waste walking. But see the 1.0 note below — this matters less than it used to.
- Water access — for watering plantations, and, new in 1.0, as buildable space.
- Defensibility — elevated or choke-pointed spots are easier to wall off. (Just don’t rely on being “unraidable” — see below.)
- A nearby fast-travel statue — for hauling loot and shuttling between bases.
- A survivable biome — early on, avoid extreme heat (volcano/desert) and cold (snow) until you have heat/cold-resistant gear.
- A food source — berries or a plantation, so your Pals don’t stop working.
What 1.0 changed (so ignore the old advice)
- Ore is more widespread now. The official patch notes say 1.0 “increased ore distribution in the overworld, expanding viable base location options” — you’re no longer forced onto a handful of ore cliffs.
- You can mine without natural nodes. Structures like the Ore Mining Site and Coal Mine (both already around before 1.0) produce ore and coal with an assigned Pal and no node, and 1.0 adds a High-Pressure Crude Oil Extractor (oil without an oil field) and an Ancient Material Synthesizer. So late-game, base placement is far more about flat space than sitting on ore.
- “Unraidable cliff” bases are no longer a sure thing. Raids were reworked into a wave-based system, and the patch specifically “added countermeasures for situations where raiding enemies become stuck” — which targets the old trick of parking where raiders can’t path. Defenses no longer consume ammo, and a Negotiator can cancel an incoming raid for gold — so plan to actually defend, not to cheese. (More on this below.)
- You can build on water. The Aquatic Construction Kit lets you build out to sea (shallow water needs no kit; deeper water does), opening coastal and lakeside spots.
- You have up to 4 base slots — worth flagging because many guides still say 3, though the bump to 4 actually landed back in the Feybreak update, not 1.0. They unlock as you raise your base level (World Settings can lift the cap further), so the winning play is one main hub plus specialist outposts.
Every base compared, in one chart
Before the map, here’s every base scored across the things that actually matter. Warmer = stronger. These are relative editorial ratings of the qualitative facts, not in-game numbers — Palworld has no base-quality stat.
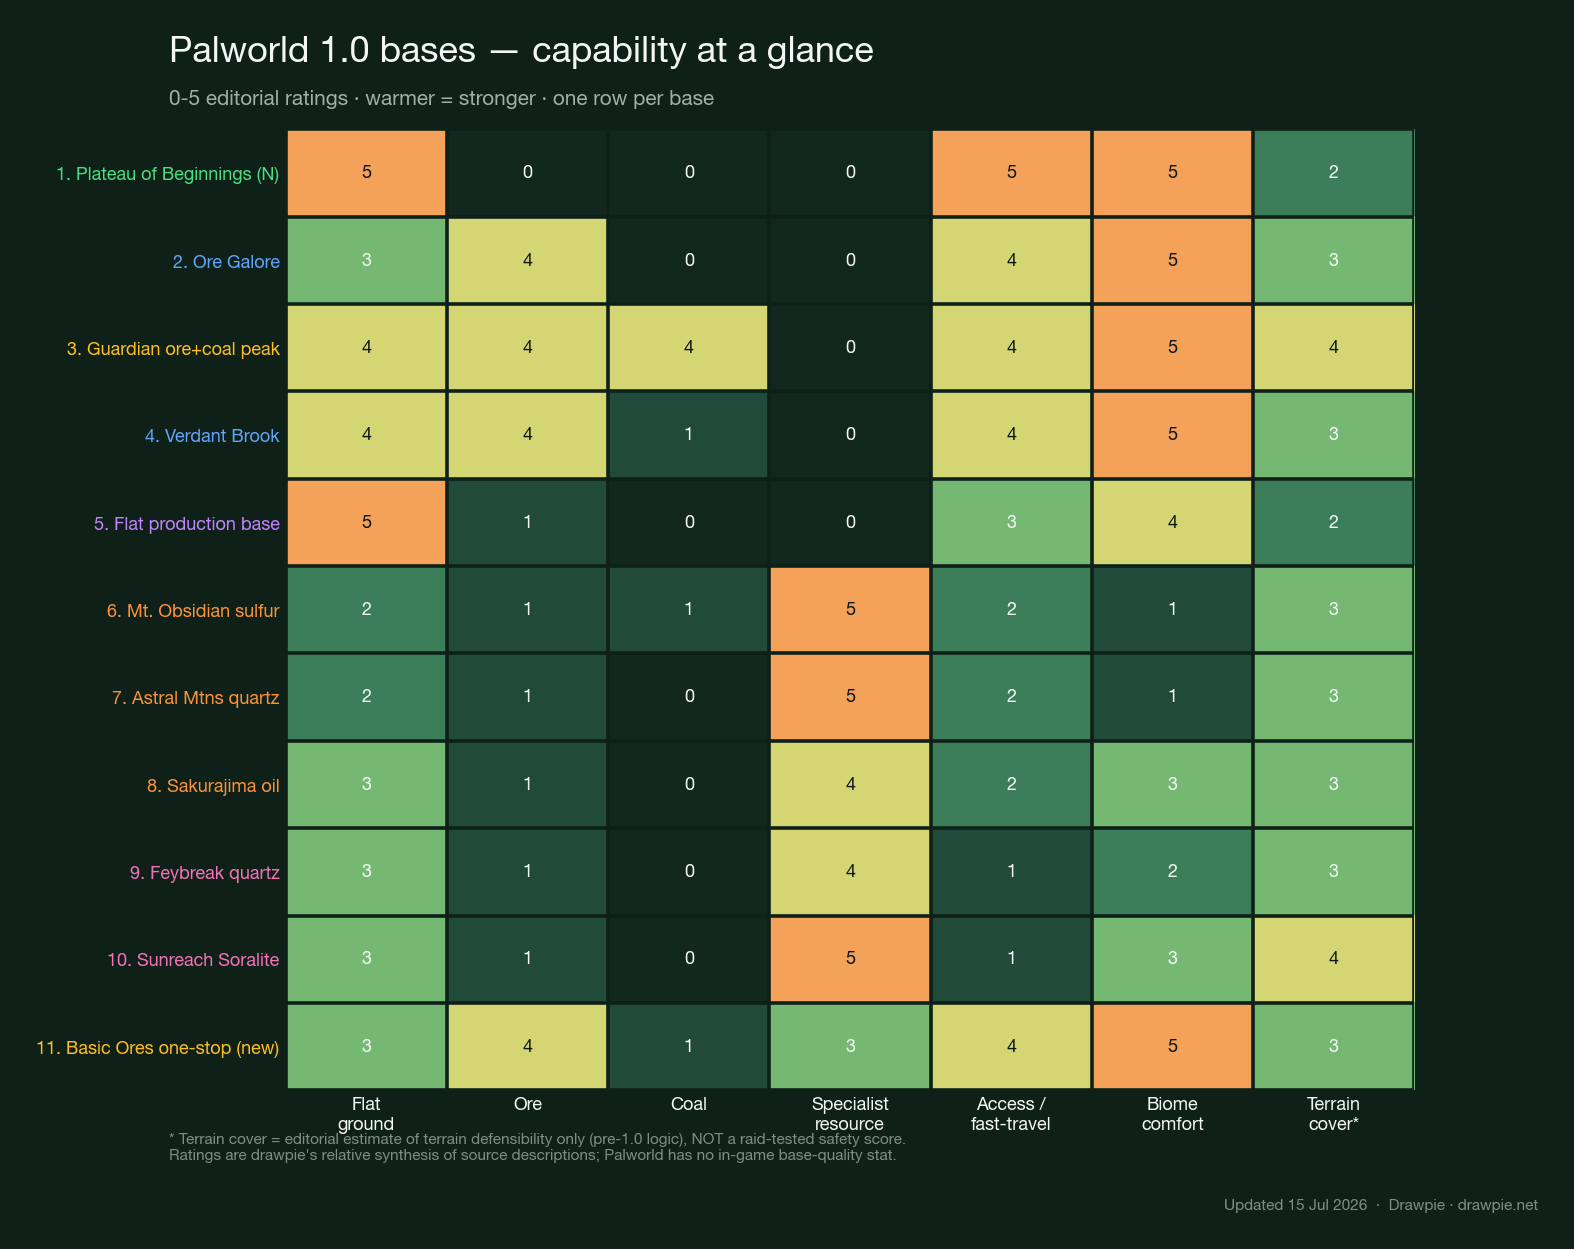
| Base | Standout strengths | Weak spots |
|---|---|---|
| Plateau of Beginnings (N) | Flat 5, access 5, comfort 5 | No ore, no coal |
| Ore Galore | Ore 4, comfort 5 | No coal, medium flatness |
| Guardian ore+coal peak | Ore 4, coal 4, comfort 5 | No specialist resource |
| Verdant Brook | Ore 4, flat 4 | Little coal |
| Flat production base | Flat 5 | Few resources; coord unverified |
| Mt. Obsidian sulfur | Specialist 5 (sulfur) | Comfort 1 (hot), low flat |
| Astral Mtns quartz | Specialist 5 (quartz) | Comfort 1 (cold), low flat |
| Sakurajima oil | Specialist 4 (oil) | Access 2, Lv 50+ |
| Feybreak quartz | Specialist 4 | Access 1, endgame |
| Sunreach Soralite | Specialist 5 (Soralite) | Access 1, endgame |
| Basic Ores one-stop ★new | Ore 4, specialist 3, comfort 5 | Single-source, counts unverified |
The pattern: the all-rounders (Guardian peak, Basic Ores one-stop) stay warm across the board, while the specialist outposts spike on one resource and go cold on comfort and access. The starter Plateau is the outlier — top marks for safety and flat ground, but a zero for ore.
All the best base locations (map)
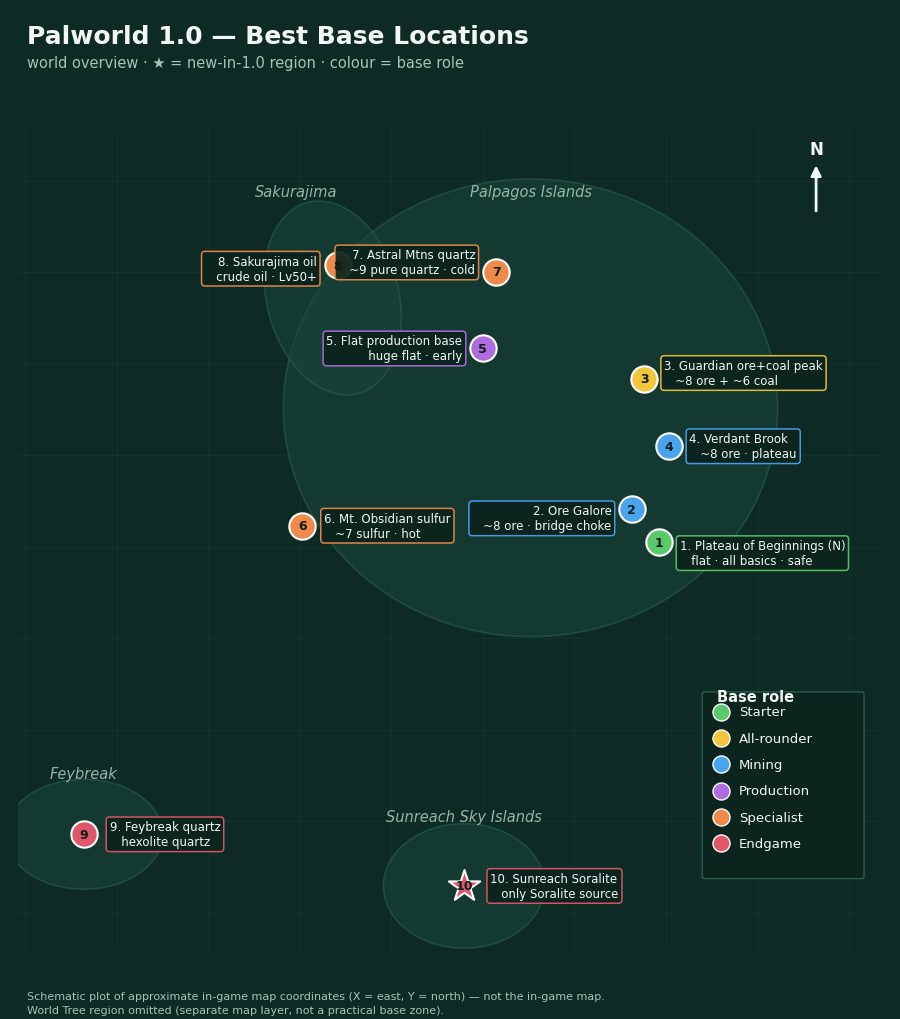
This is a schematic plot of each spot’s in-game coordinates (X = east, Y = north) — not the game’s own map. Here’s the same data as a table:
| # | Base | Role | Coords (X, Y) | Resources / why | Biome |
|---|---|---|---|---|---|
| 1 | Plateau of Beginnings (N) | Starter | 232, −487 | Flat; stone/wood/Paldium/berries; ore is south at (264, −548); enemies Lv 1–3 | Grassland |
| 2 | Ore Galore | Mining (starter) | 156, −396 | ~7 ore on a hilltop by the first tower; single-bridge choke | Grassland |
| 3 | Guardian ore+coal peak | All-rounder | 180, −39 | ~8 ore + ~6 coal together (est.); smelt on site | Hills |
| 4 | Verdant Brook | Mining | 259, −225 | ~8 ore, flat plateau, good for on-site smelting | Grassland |
| 5 | Flat production base | Production / breeding | −251, 42 † | Huge flat area, available early; some ore | Forest |
| 6 | Mt. Obsidian sulfur | Specialist | −744, −442 | ~7 sulfur (gunpowder/ammo); hot — needs heat gear | Volcano |
| 7 | Astral Mtns quartz | Specialist | −212, 250 | 9 Pure Quartz (circuit boards); cold — needs cold gear | Snow |
| 8 | Sakurajima oil | Specialist | −646, 270 | Crude oil (polymer); Lv 50+; game8’s overall #1 base | Sakurajima |
| 9 | Feybreak quartz | Endgame | ~−1340, −1285 | Hexolite Quartz + oil nearby; Lv 52+ | Feybreak |
| 10 | Sunreach Soralite ★ | Endgame (new 1.0) | −302, −1426 | The only source of Soralite; reach via the Feybreak Tower | Sunreach sky islands |
| 11 | Basic Ores one-stop ★ | All-rounder (new) | 290, −100 | Iron/ore + sulfur + pure quartz in one radius (reported) | Palpagos (main island) |
★ new-in-1.0 region or newly-added pick. † Base 5’s coordinate is drawpie-only and unverified against external maps. Node counts vary a little by source and after the 1.0 rebalance, so treat “~” values as “roughly.”
The best first base
For your very first base, near where you spawn on the Plateau of Beginnings, there are two good approaches:
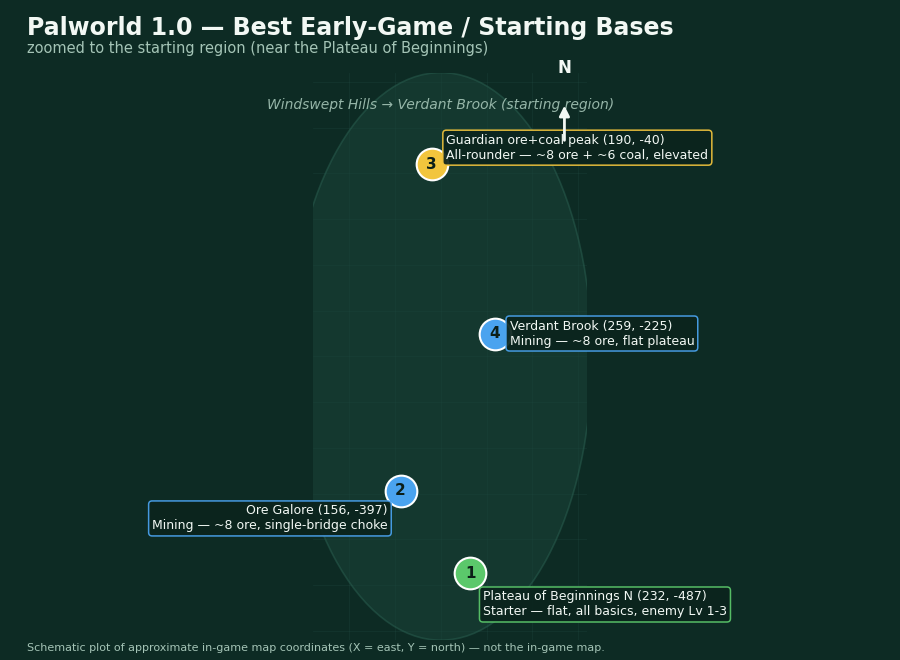
- Safe all-rounder — Plateau of Beginnings (North), ~(232, −487). The classic low-risk starter: a big flat area with stone, wood, Paldium and berries, and only level 1–3 enemies nearby. The one caveat 1.0-era guides get wrong: the North flat itself has no ore — the nearest ore is a short walk south at ~(264, −548). Pick this if you want a smooth, safe start.
- Ore rush — “Ore Galore,” ~(156, −396). Roughly 7 ore nodes (game8’s count) on a hilltop right by the first tower boss, with a single narrow bridge for easy walling. Pick this if you’d rather flood yourself with ingots early and don’t mind slightly higher risk.
Either way, your first base doesn’t have to be permanent — you’ll likely relocate the main operation to the ore-and-coal peak below once you’re mid-game.
The best main base
- Guardian ore+coal peak, ~(180, −39). Just near the Sealed Realm of the Guardian fast-travel statue sits the best all-round base on the main island: roughly 8 ore and 6 coal nodes in one build radius (a community estimate — game8 confirms the spot and calls it a “staggering” amount but doesn’t give a count), so you can smelt ingots without hauling anything. It’s on elevated terrain that’s easy to wall off — just don’t assume it’s raid-proof in 1.0. Enemies nearby are around level 20–25.
- Basic Ores one-stop, ~(290, −100) — new to this guide. gamerant’s 14 July “I tested every base” run crowned a main-island spot that puts iron/ore, sulfur and pure quartz in a single radius, which no other main-island base here does. It’s a single (reputable) source and the node counts aren’t map-verified yet, so treat the resource richness as reported — but if it holds up, it’s the most convenient all-in-one hub on Palpagos.
- Verdant Brook, ~(259, −225) is a strong pure-mining alternative — about 8 ore on a flat plateau — if you’d rather keep mining and building separate.
Resource payoff vs risk
Which bases are worth the danger? This plots each base’s resource payoff (our ore + coal + specialist rating) against the enemy level nearby — and the enemy bands here are the sourced ones, not a made-up “safety” score.
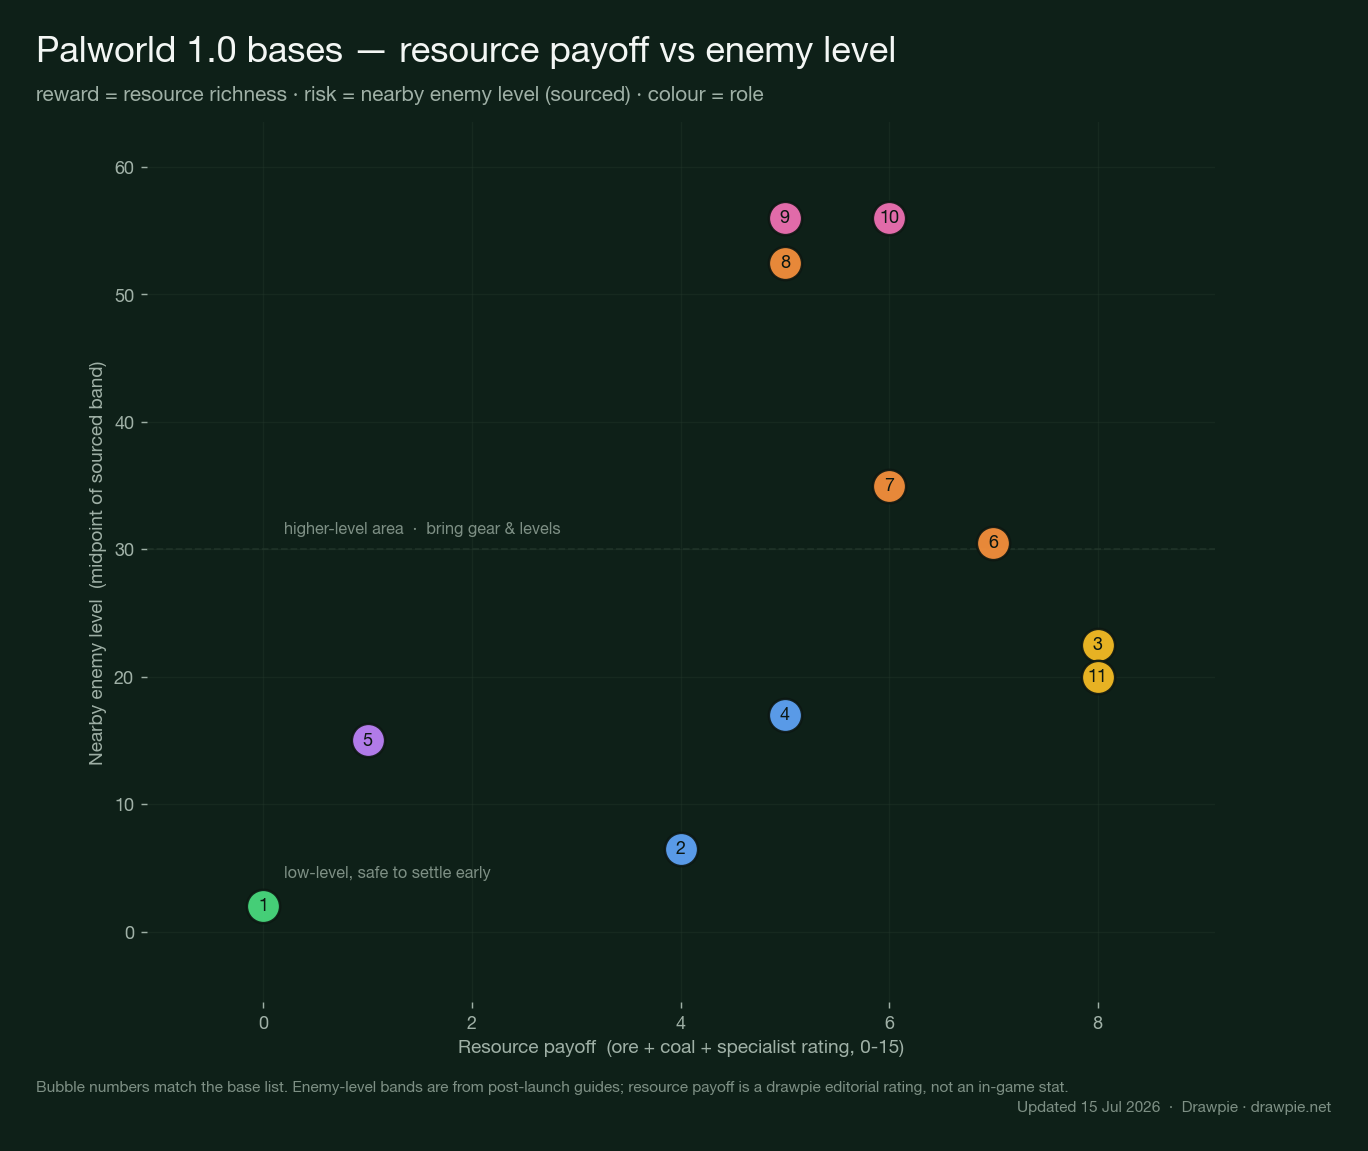
| Zone | Bases | Read |
|---|---|---|
| Low risk, low mining payoff | Plateau (1) | Safe to settle turn one; it’s a home, not a mine |
| High payoff, manageable risk | Guardian (3), Basic Ores (11), Verdant (4) | The main-base sweet spot |
| High payoff, high level | Sakurajima (8), Feybreak (9), Sunreach (10) | Endgame outposts — bring gear and levels |
| Specialist, mid level | Obsidian (6), Astral (7) | Worth it for the one resource, needs climate gear |
The takeaway: your main base wants the far-right, mid-height cluster — lots of resources without level-50 enemies at the door. Save the top-right spots for when you’re kitted out.
Base × resource supply matrix
Need one specific material? This matrix shows how rich each base is per resource. Bold numbers are the only corroborated hard node counts; everything else is a relative richness tier.
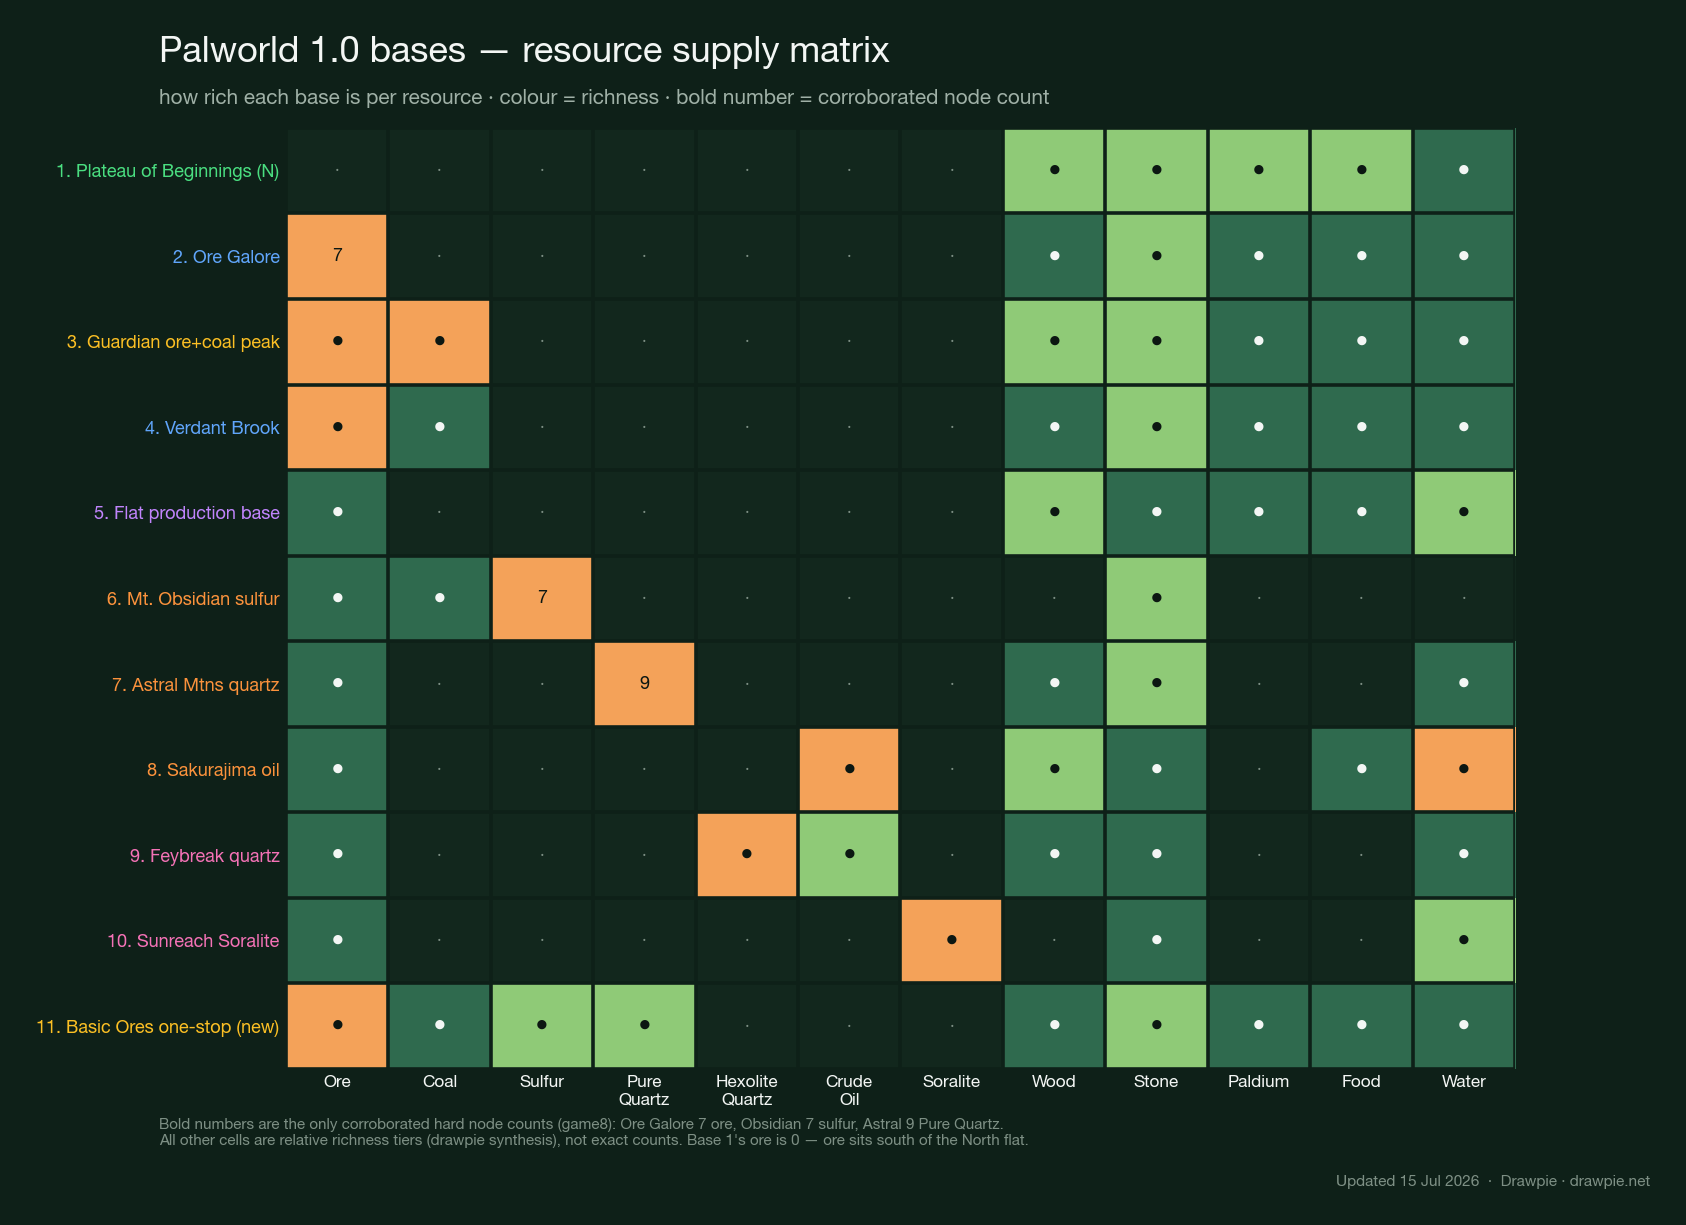
- Signature resources are region-locked. Soralite is Sunreach-only, Hexolite Quartz is Feybreak, sulfur means the volcano, crude oil means Sakurajima or an oil field.
- The Basic Ores one-stop (11) is the only base covering ore + coal + sulfur + pure quartz in one place — which is exactly why it’s a strong hub if the counts hold up.
- The Plateau (1) row is deliberately empty of ore/coal — it’s a safe starter with basics (wood, stone, Paldium, food), not a mining base.
The Base Location Finder tool
Reading a table is one thing; matching a base to your run is another. Our free Palworld 1.0 Base Location Finder does four jobs at once:
- Scores every base against your priorities — slide up “flat ground,” “ore,” “safety,” “convenience” and it re-ranks all 11 bases for how well they fit.
- Filters by the resource you need — tick “sulfur” or “Soralite” and it shows only the bases that supply it.
- Matches a base to a purpose — pick “first base,” “main hub,” “sulfur outpost” and it recommends the right spot.
- Sorts by distance from where you are — type your current in-game (X, Y) and it orders bases by how far you’d have to travel.
It runs on the same verified coordinate-and-resource data as this guide. Open the Base Location Finder →
Specialist and endgame bases
With up to four base slots, dedicate the extras to the materials you can’t easily carry:
- Sulfur — Mount Obsidian, ~(−744, −442). About 7 sulfur nodes for gunpowder and ammo. It’s in the volcano, so bring heat-resistant gear; enemies ~Lv 25–36.
- Pure Quartz — Astral Mountains, ~(−212, 250). Around 9 Pure Quartz nodes (one of the two firmly-corroborated counts) for circuit boards and higher tech, in the snow — cold-resistant gear required.
- Crude Oil — Sakurajima, ~(−646, 270). An oil-field flat for polymer production; a Lv 50+ endgame outpost — and the base game8 rates its best overall.
- Hexolite Quartz — Feybreak, ~(−1340, −1285). An endgame quartz/oil outpost on Feybreak Island, Lv 52+ (sources place it anywhere from (−1066, −1430) to (−1340, −1285), so look around southern Feybreak).
- Soralite — Sunreach, ~(−302, −1426). New in 1.0: Sunreach’s floating islands are the only place to mine Soralite, the ore behind the best new weapons and gear. Reach it by beating the Feybreak Tower and heading to the sky islands, and bring the Plasma Multicutter tool — it’s the only way to harvest Soralite.
Is any base actually raid-proof in 1.0?
Short answer: no — and this is the biggest thing 1.0 changed for base placement. Raids were reworked into a wave-based system, the raiding faction and enemy type vary by biome, and — critically — raider level scales to the work Pals you’ve assigned to that base, so a high-output base draws tougher raids. Most damaging to the old meta, the patch “added countermeasures for situations where raiding enemies become stuck,” which directly targets the cliff/pillar/water cheese that “unraidable” bases relied on.
What that means in practice:
- Terrain still helps, but it isn’t immunity. An elevated, choke-pointed spot (the Guardian peak, Ore Galore’s single bridge) still makes defending easier — just don’t build assuming raiders can never reach you.
- Actually build defenses. Turrets and walls work, and in 1.0 defenses no longer consume ammo, so there’s no reason not to wall up and mount turrets.
- Buy your way out if you must. A Negotiator Pal can cancel an incoming raid for gold — a useful panic button for a base you haven’t finished fortifying.
So the honest framing is raid-resistant, not raid-proof: pick defensible terrain, then defend it.
Common beginner mistakes
- Building on a slope or cluttered ground. The single most common mistake — it wrecks Pal pathing and wastes your build radius. Prioritise flat.
- Chasing a pretty view with no resources or water. Function first; a scenic empty cliff is a slow base.
- Settling in an extreme biome too early. Volcano and snow bases damage you and your Pals without the right gear — save those for specialist outposts once you’re equipped.
- Forgetting food. No berries or plantation means your Pals stop working; sort a food source on day one.
- Trusting the old “unraidable cliff.” 1.0 patched that with an anti-stuck countermeasure. Build actual defenses.
Frequently asked questions
What’s the best base location in Palworld 1.0?
For a first base, the Plateau of Beginnings (North) flat at ~(232, −487) — flat, safe, temperate. For your main base, the ore-and-coal peak near the Sealed Realm of the Guardian at ~(180, −39), which gives you roughly 8 ore and 6 coal in one spot; the new-in-1.0 “Basic Ores one-stop” at ~(290, −100) is a tested alternative that adds sulfur and quartz.
How do you find coordinates in Palworld?
Open the in-game map and read the two-number (X, Y) coordinate shown for your cursor/position. Every coordinate in this guide is that in-game map readout — head to the numbers and look around for the flat ground and nodes.
How many bases can you have in Palworld 1.0?
Up to 4, unlocked as you raise your base level (older guides say 3 — that’s outdated). Dedicate them to a main hub plus specialist resource outposts.
Can you build a raid-proof base in Palworld 1.0?
No. 1.0 reworked raids into a wave-based system, scaled raider level to the work Pals at a base, and added a countermeasure for raiders getting stuck on terrain — which removes the old “unraidable cliff.” Defensible terrain plus real defenses (turrets no longer cost ammo) is the best you can do; a Negotiator Pal can cancel a raid for gold.
Do I still need to build on ore nodes in 1.0?
Less than before. 1.0 spread ore more widely, and node-free structures — the Ore Mining Site and Coal Mine, plus 1.0’s new High-Pressure Crude Oil Extractor and Ancient Material Synthesizer — produce resources without any natural node, so late-game you can prioritise flat space and build your own mining. Early on, sitting on nodes is still the fastest start.
Where do I get Soralite for a base?
Only in the Sunreach sky islands (reached after the Feybreak Tower), and only with the Plasma Multicutter tool. A base at ~(−302, −1426) keeps Soralite in range.
The bottom line
Start safe on the Plateau of Beginnings (North), move your main operation to the ore-and-coal peak at ~(180, −39) — or gamerant’s tested one-stop at ~(290, −100) — then spend your remaining base slots on the specialist materials you hate carrying. Above all, 1.0 rewards flat ground and punishes the old “unraidable cliff” habit — pick open space near what you need, build real defenses, and let the new mining structures cover the rest. When you’re weighing spots, the Base Location Finder will rank them against your own priorities in seconds.
More Palworld 1.0, explained: the tower boss guide , the new weapons guide , the stat priorities guide , the breeding guide , and our breeding calculator for all 287 Pals .